Create automations
Before you start
Before you create an automation, make sure that:
Your organization is set up for Air Teams. This is done once by an admin – see Set up Air Teams.
You are signed in to Air Teams with your JetBrains Account and have access to the organization.
The repository you want to automate is available through a configured repository connection. Automations work with any connected provider – GitHub, GitHub Enterprise Server, GitLab, and GitLab Self-Managed. If needed, see Connect a VCS provider.
Create an automation
You can create an automation from scratch or start from an automation template. A template pre-fills the automation's definition, and you can edit it afterward. You apply a template while creating or editing the automation, so the rest of the workflow is the same either way.
Create an automation
Log in to https://air.jetbrains.cloud with your JetBrains Account.
Open the Automations page.
Click New Automation, in the sidebar or in the top-right corner of the Automations page.
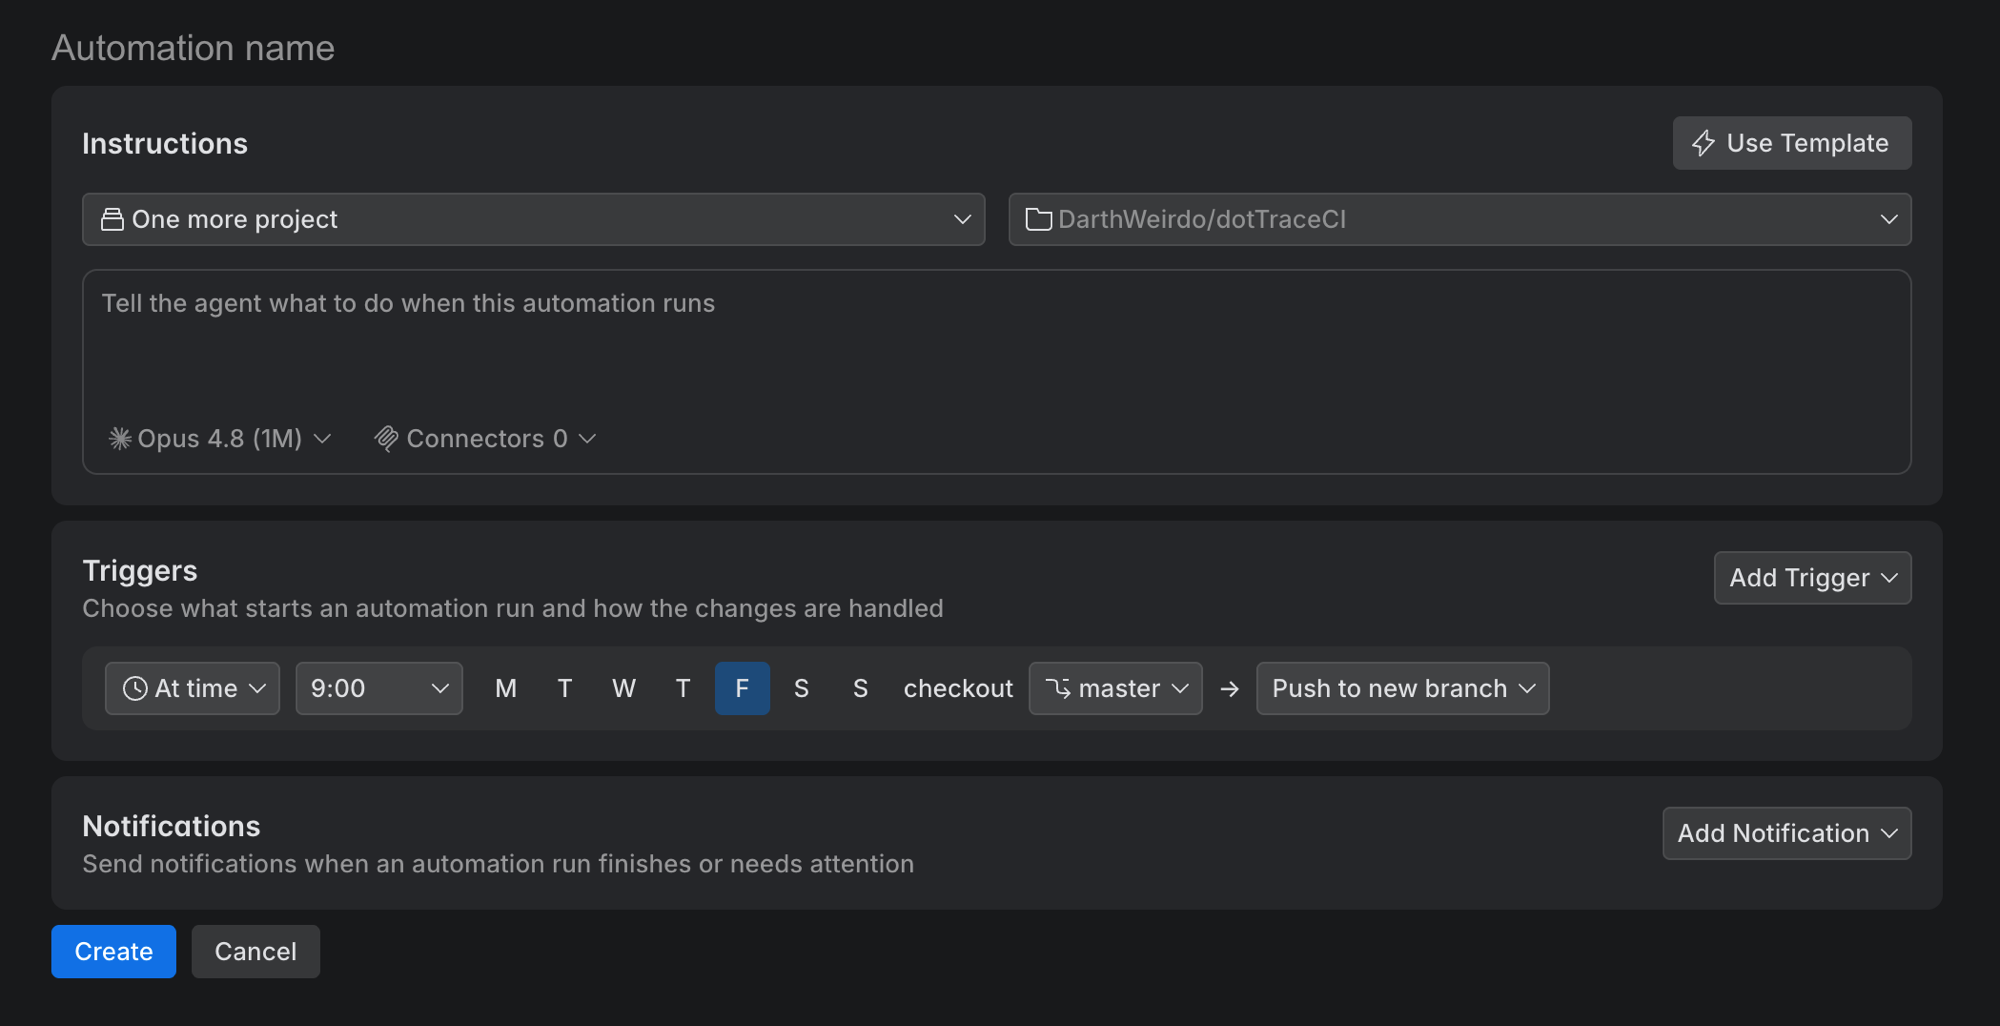
Enter a name for the automation in the Automation name field.
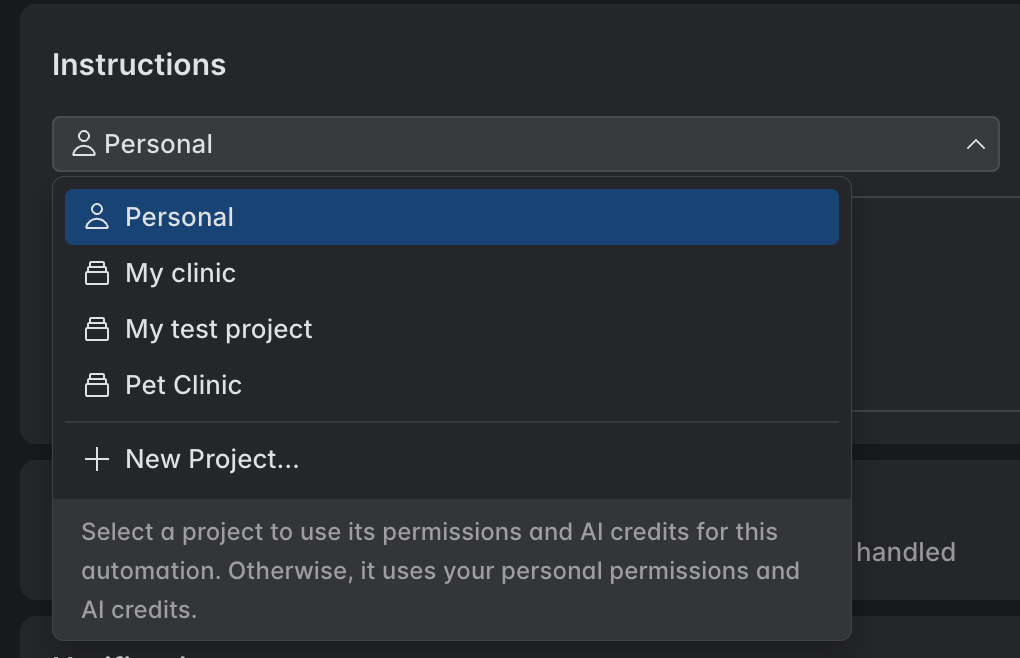
Under the name, use the scope selector to set who the automation belongs to: keep Personal to keep it to yourself, or select a project to share it with the project's members. Project admins can manage a project automation, and the project decides whether its runs spend the project's AI credits or yours. The scope also sets which environments and connectors you can select. For details, see Sharing automations in projects.
Click Select repository and select the repository the automation works on. If you have a preconfigured environment configuration for that repository, select it to run with its dependencies and settings; otherwise the automation uses the repository's default cloud environment. For details, see Configure environments for automations.
To let the run work on more than one repository, select several – see Run an automation on several repositories. For work that doesn't need code, leave the repository empty – see Run an automation without a repository.
In a project whose automations run on the project's AI credits, a GitLab repository is available only if both you and the project's GitLab account can reach it. The ones its account can't reach are marked No project access – see Set up GitLab access for project automations.
Define what the automation does:
Instructions – the instructions the agent follows when the automation starts
Use Template – opens the list of automation templates. Select one to fill in the instructions, model, triggers, and connectors from a ready-made definition, which you can then edit. A template can also ask for parameter values and take extra instructions of your own.
Model – the model used for automation runs
For a step that a person has to do instead of an agent, click Person in the form header – see Automations done by a person.
Optionally, in Triggers, add one or more triggers. Each trigger configures two things:
How a run starts – an event or a schedule, plus the branch the run works on
What to do with the changes – whether the run commits them, opens a pull request, or reports back without touching the code
For details, see Automation triggers.
Event triggers follow the service that hosts the repository: Add Trigger offers GitHub events for a GitHub repository and GitLab events for a GitLab one. If you later switch the automation to a repository on the other service, its event triggers change to the matching events, and the settings the new service doesn't support are cleared.
An automation without triggers never starts on its own. It runs only when you start it with Run Now – see Run an automation manually.
In Connectors, add connections to the MCP servers that the agent can use during the run. For details, see Connectors.
In Notifications, optionally add one or more notifications, including outgoing webhooks. For details, see Automation notifications.
Click Create.
Configure environments for automations
Automations are cloud tasks, so they run in cloud environments.
If you select just a repository in the repository selector, the automation runs in that repository's default cloud environment. This is enough for simple cases.
If the automation needs specific dependencies, environment variables, secrets, or other runtime settings, create an environment configuration for the repository in advance, then select it instead of the repository – see Configure environments.
The environments you can select depend on the automation's scope: a personal automation (Personal) lists your personal environments, and a project automation lists that project's environments.
Each run gets its own environment, but a run can start from a snapshot of an earlier run or task on the same repository, so files outside the repository can be preserved. Don't rely on that for correctness – see Snapshots and preserved state.
Run an automation on several repositories
An automation can work on more than one repository in a single run. Use it when the task spans code that lives apart – for example, a service and its clients, or an application and a repository of shared configuration. Every run clones all the repositories into one cloud environment, and the agent works across them.
- How a multi-repository run works
One repository is the primary one – the first one you select, or the repository of the environment if you select one. The run's environment is set up for it, and only its events start the automation.
Each repository gets its own folder – the repositories are cloned side by side into /workspaces/<repository>, and the agent starts in /workspaces. Because the folder is named after the repository, you can't combine two repositories with the same name, such as a fork and its upstream.
Providers can differ – a GitHub repository can sit next to a GitLab one. You need access to every repository you add.
Each repository has its own branch – each trigger sets which branch every repository checks out and what Air Teams does with its changes.
Environments support – an automation can combine one environment with several repositories, but not two environments. An environment configuration holds one repository.
Access covers the whole set – to edit the automation, run or rerun it, or read a run's chat, you need access to every repository in it. A project automation is paused if the project's GitLab account can't reach one of its GitLab repositories – see A project's GitLab automations are paused.
Repository limit – you can add up to 10 repositories next to the primary one.
- Startup scripts, MCP servers, and skills
Every repository can have its own setup and agent files. Air Teams handles them as follows:
Startup scripts – the startup script (.air/cloud/startup.sh) of every repository runs before the agent starts. Run order is undefined.
MCP servers – Air Teams combines the .mcp.json servers from all repositories, and the agent gets each of them alongside your connectors. Give servers unique names across the repositories to avoid conflicts.
Skills – skills from all repositories are available to the agent. As with MCP servers, keep skill names unique across the repositories.
Instructions and commands – files such as AGENTS.md and CLAUDE.md, and custom commands, aren't combined. They stay in their repository, and the agent starts above all of them, so don't count on them for rules that apply to the whole run. Put those in the task definition or the automation's Instructions.
Add repositories to an automation
Under the automation name, click the repository selector and select the checkbox next to each repository the automation needs. The first one you select is the primary repository.
To run the automation with an environment configuration, select it in the same list. The environment's repository is always the primary one, and the repositories you select are added to it. You can select only one environment.
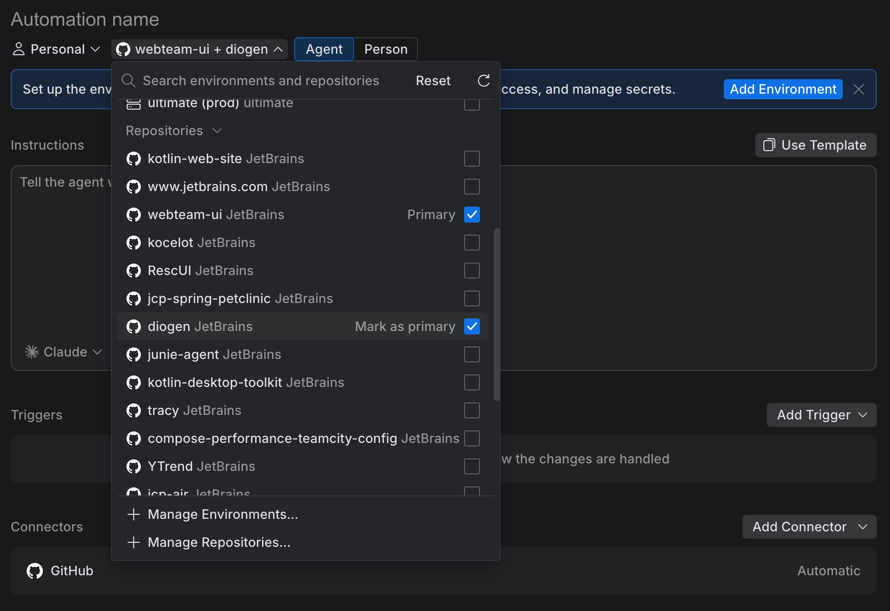
To make another repository the primary one, hover over it and click Mark as primary. This isn't available when you've selected an environment.
In Triggers, set the branch and the change handling for each repository. Triggers listen to the primary repository only: an event in another repository, such as a new pull request, doesn't start a run.
By default, each repository uses its default branch and No code changes. The change handling options you can choose depend on the start condition:
With a pull request trigger, the run can push to the primary repository only on the pull request's branch.
With a trigger, the other repositories are limited to No code changes.
With a schedule, every repository can use any option.
In Instructions, tell the agent which repository holds what and which ones it should change. Air Teams lists the repository folders and branches for the agent, but not what each repository is for.
Run an automation without a repository
Not every automation works on code. Triage of new issues, a weekly summary of a Jira project, or a report built from your connectors needs no checkout. For such work, don't select a repository when you create the automation. The run starts without cloning anything, and the agent works only with the automation's Instructions and connectors.
Without a repository, an automation can't use:
An environment configuration. An environment belongs to a repository.
Environment variables and secrets. They come only from an environment configuration. To reach external services, use connectors – they sign in on their own.
Additional repositories.
Schedules, repetitive runs, Jira events, chained automations, and incoming webhooks work as usual.
Add MCP connectors
Connectors give the automation's agent access to external tools through MCP, so it can read and act on data in services such as Sentry, Jira, or Figma during a run. In the Connectors section of the automation settings, click Add Connector and select which connectors this automation uses.
The connectors you can pick depend on the automation's scope:
A project automation can only use the project's connectors, listed under Project Connectors. To make another one available, a project admin has to add it to the project first – see Add connectors to a project.
A personal automation uses your personal connectors, and you can click Add Personal Connector to connect a service without leaving the form – see Add a personal connector.
Selecting connectors doesn't replace mcp.json. The agent also uses any MCP servers defined in a .mcp.json file in the repository root, alongside the connectors you select. See MCP servers via .mcp.json.
Sharing automations in projects
An automation is either personal or shared within a project. This sets who can use it and whose AI credits its runs consume:
Personal – the default. Only you can view, edit, or run the automation, and its runs consume your AI credits.
Project – project admins can manage the automation, and project members can view it and run it manually. Whose AI credits its runs consume depends on the project's AI Credits setting – see AI credits for automation runs.
That setting also decides who the run is, so it decides how the run reaches the repository – see How automation runs reach the repository.
To share an automation, select a project in the scope selector under the automation name when you create or edit the automation. You can change the project at any time or set it to Personal to make the automation personal again.
AI credits for automation runs
Every automation run consumes AI credits. A personal automation always spends yours. A project automation spends whichever credits the project's admins chose in project settings, under AI Credits: the project's own credits, or the personal credits of the person who created the automation. See AI credits for project automations.